
Introduction: Unleashing Your Creativity on Canvas Totes
In a world where mass production dominates, creating personalized items adds a unique touch that speaks volumes about individuality. Customizing tote bags with fabric paint has emerged as a popular creative outlet, combining functionality with self-expression. Whether you’re looking to craft personalized gifts, promote your brand, or simply indulge in artistic expression, fabric-painted tote bags offer endless possibilities. This comprehensive guide will walk you through everything you need to know about transforming plain canvas totes into wearable art pieces using fabric paint. From selecting the right materials to mastering advanced techniques, you’ll discover how this craft allows for personalization while being eco-friendly – a perfect alternative to disposable bags that harm our environment.
Understanding Fabric Paint: Types and Selection
Before diving into the creative process, it’s essential to understand the various types of fabric paints available. According to Martha Stewart Living, fabric paints can be categorized into several types, each with distinct properties and applications. Acrylic fabric paints offer vibrant colors and excellent coverage, while fabric dyes penetrate the fibers for a more natural look. Some paints require heat-setting with an iron, while others air-dry permanently. For beginners, all-purpose fabric paints that come in squeeze bottles provide ease of application and reasonable durability.
When selecting fabric paint for your tote bag project, consider factors such as the fabric type, desired finish (matte, glossy, or metallic), and intended use of the bag. For frequently washed totes, opt for high-quality permanent fabric paints labeled as machine-washable. The Spruce Crafts recommends testing your chosen paint on a scrap piece of similar fabric to ensure it achieves the desired effect and durability. Additionally, consider whether the paint requires supplementary products like fabric medium (for mixing with regular acrylic paint) or heat-setting tools to ensure longevity.
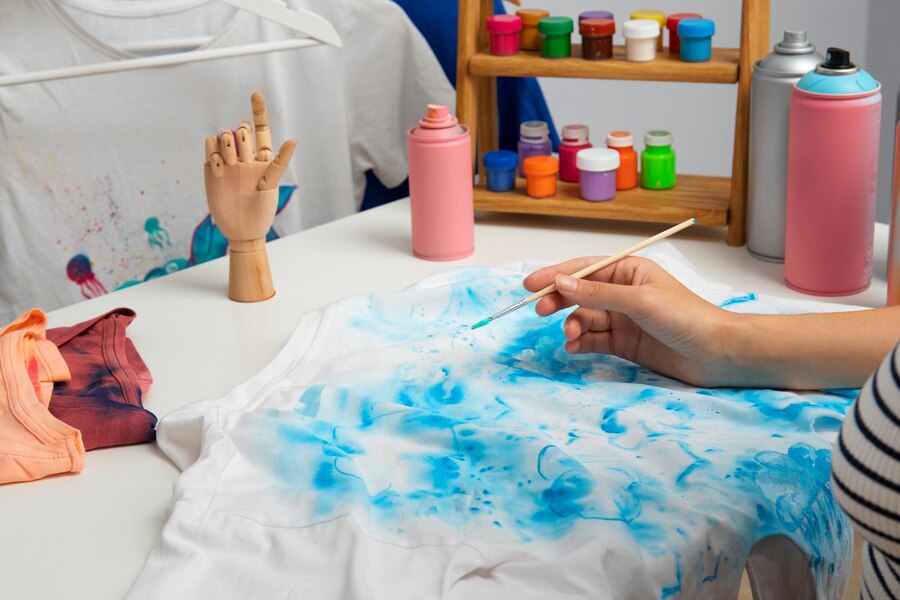
Essential Materials and Tools for Your Project
Gathering the right supplies is crucial for a successful tote bag painting project. Beyond the obvious fabric paint and blank tote bag, several tools and accessories will facilitate the creative process:
- Plain Canvas Tote Bags: According to JoAnn Fabrics, 100% cotton canvas totes provide the ideal surface for fabric paint. Opt for pre-washed, unbleached versions for the best paint absorption.
- Fabric Paints: Brands like Tulip, Jacquard, and DecoArt offer excellent fabric painting options, as noted by Michael’s Arts and Crafts.
- Brushes and Applicators: Flat brushes for large areas, round brushes for details, and specialized fabric paint applicators for precise lines.
- Stencils and Templates: These help achieve professional-looking designs even for beginners.
- Palette and Mixing Containers: For blending custom colors.
- Protective Surface Covering: Newspaper, plastic, or a dedicated craft mat to protect your work surface.
- Masking Tape: For creating clean edges and securing stencils.
- Iron and Ironing Board: For heat-setting the paint after it dries (if required by your specific paint type).
- Cardboard Insert: To prevent paint from bleeding through to the other side of the bag.
The quality of these materials significantly impacts the final result of your project. Investing in good-quality paints and tools, as recommended by Artist & Craftsman Supply, ensures vibrant colors, smoother application, and greater durability over time.
Preparation: Setting Up Your Workspace and Materials
Creating an optimal workspace is crucial for a successful tote bag painting project. First, find a well-ventilated area with good lighting, preferably natural light. According to HGTV, a dedicated craft space improves creativity and execution. Cover your table with a protective plastic sheet or newspaper to prevent stains on your furniture. Set up your materials within reach but away from the edge of your workspace to prevent accidental spills.
Before painting, proper preparation of the tote bag is essential. The DIY Network recommends washing the tote bag first to remove any sizing or chemicals that might interfere with paint adherence. Once dry, iron the bag to eliminate wrinkles that can distort your design. Insert a piece of cardboard inside the bag to prevent paint from bleeding through to the other side. This cardboard should be slightly smaller than the bag’s dimensions to allow for easy insertion and removal.
If your design requires precise placement, lightly mark the tote bag with tailor’s chalk or disappearing fabric markers. These guidelines can help maintain proportions and alignment, especially for complex designs. For stenciled designs, secure the stencil with masking tape to prevent shifting during the painting process. Remember to let the paint dry completely between colors to avoid unintentional blending or smudging.
Design Planning: From Concept to Canvas
The planning phase of your tote bag project deserves significant attention, as it lays the foundation for successful execution. According to Adobe’s Creative Cloud blog, effective textile design begins with conceptualization and sketching. Start by gathering inspiration from various sources – nature, architecture, fashion trends, or personal interests. Create a mood board using platforms like Pinterest or Instagram to collect ideas that resonate with your aesthetic vision.
When developing your design, consider both practicality and artistic expression. The placement of your design should account for how the bag folds and how it will be carried. According to Design Milk, designs placed too low might be obscured when the bag is carried, while designs placed too high might be partially hidden by straps. For beginner artists, simpler designs with bold shapes and limited color palettes often yield the most professional-looking results.
Sketching your design on paper before transferring it to the tote allows for experimentation and refinement. If you’re uncertain about your drawing skills, numerous free printable templates are available online from resources like Creative Fabrica. Alternatively, you can trace existing images or use stencils to achieve precise shapes. Remember to scale your design appropriately for your tote bag size – a design that works on paper might need adjustment to fit harmoniously on your bag.
Basic Techniques: Getting Started with Simple Designs
For beginners, mastering a few fundamental techniques can build confidence and produce impressive results. According to Craftsy, starting with basic brush strokes and simple patterns helps develop control and precision. Begin by practicing on scrap fabric before moving to your tote bag.
The dot technique, created by dipping the end of a paintbrush or specialized dotting tool into paint and applying it to the fabric, offers a foolproof way to create polka dots, flowers, or abstract patterns. For straight lines, use masking tape as a guide to achieve crisp edges. When creating larger filled areas, start from the center and work outward using consistent, even strokes to avoid streaking.
Stenciling is particularly beginner-friendly, as explained by Plaid Online. To stencil effectively, secure your stencil with tape, then apply paint using a stippling motion with a stiff brush or foam stencil dabber. Use minimal paint to prevent bleeding under the stencil edges. For gradient effects, blend two colors together while the paint is still wet, or layer colors from light to dark after allowing drying time between applications.
Basic stamping can be achieved using purchased rubber stamps or DIY stamps made from potatoes, erasers, or foam sheets. According to Artistro, the key to successful stamping is consistent pressure and adequate paint loading – too much paint results in blurry images, while too little creates patchy impressions.
Advanced Techniques: Elevating Your Tote Bag Designs
Once you’ve mastered the basics, you can explore advanced techniques that add sophistication to your tote bag designs. According to Artists Network, incorporating multiple techniques within a single project creates visual interest and showcases your growing skill level.
Detailed Stenciling with Layering
Create complex, multi-colored designs by layering stencils. As recommended by Royal Design Studio, allow each layer to dry completely before applying the next stencil. This technique creates depth and dimension, perfect for creating floral designs or intricate patterns.
Fabric Paint Marbling
This technique creates unique, one-of-a-kind swirled patterns reminiscent of marble. According to Dharma Trading Co., you can achieve this effect by floating fabric paints on a water surface, swirling them with a toothpick, and then carefully placing your fabric on top to capture the design. For tote bags, apply this technique to panels before assembling, or mask off areas of a finished bag.
Ombré and Gradient Effects
Gradual color transitions add sophistication to your designs. As explained by Textile Artist, achieve this by blending wet paints together on the fabric or by applying increasingly diluted colors in horizontal or vertical bands. This technique works beautifully for backgrounds or as a standalone design element.
Hand-Painted Details
For those with artistic abilities, hand-painted details elevate a simple design to artwork status. According to Jerry’s Artarama, using fine detail brushes and practicing brush control allows for intricate elements like florals, lettering, or pictorial scenes. Consider using fabric medium mixed with artist-quality acrylic paints for the finest detail work.
Resist Techniques
Create interesting negative space designs using resist methods. As detailed by Jacquard Products, you can use rubber cement, wax, or specialized fabric resist products to block areas from receiving paint. After painting and drying, remove the resist material to reveal untouched fabric in your desired pattern.
Color Theory and Mixing: Creating Custom Palettes
Understanding color theory fundamentally transforms your tote bag designs from amateur to professional. According to Color Matters, the strategic use of color creates harmony, contrast, and visual interest in any artistic project. The color wheel serves as your guide – complementary colors (opposite on the wheel) create vibrant contrasts, while analogous colors (adjacent on the wheel) blend harmoniously.
For tote bag projects, consider both the color of your base fabric and how your chosen palette relates to the bag’s intended use. As noted by Pantone, colors evoke specific emotions and associations: blues suggest professionalism and tranquility, yellows convey optimism, and reds create energy and urgency.
When mixing custom colors, Golden Artist Colors recommends starting with primary colors plus black and white to create a versatile palette. Mix colors in small batches on a palette or plastic plate, recording your “recipes” for future reference if you create a particularly successful shade. Remember that fabric paints typically dry slightly darker than they appear when wet.
For consistency across large areas or multiple projects, mix enough paint at once rather than attempting to recreate the exact shade later. Test mixed colors on scrap fabric similar to your tote bag material to ensure the dried result matches your vision. According to Winsor & Newton, gradual additions of small amounts of contrasting colors help achieve sophisticated, nuanced shades that elevate your design’s professional appearance.
Personalization Ideas: Making Your Tote Truly Unique
The beauty of fabric-painted tote bags lies in the infinite personalization possibilities. According to Etsy Journal, custom items hold greater emotional value and demonstrate thoughtfulness. Consider these personalization approaches for different recipients and occasions:
For Personal Use
- Incorporate your favorite quotes using stenciled or hand-painted lettering
- Create a design that reflects your hobbies, interests, or personal aesthetic
- Paint symbols representing important life milestones or aspirations
For Gifts
- Add the recipient’s monogram or name in decorative typography
- Paint imagery related to their profession, hobbies, or pets
- Incorporate meaningful dates (birthdays, anniversaries) in creative ways
- Design themed bags for specific events (book clubs, yoga classes, beach trips)
For Special Occasions
- Wedding welcome bags with the couple’s initials and wedding date
- Baby shower gifts with the baby’s name and birth details
- Graduation presents featuring school colors and achievement symbols
For Business Promotion
- 99designs suggests creating branded tote bags with your business logo and tagline
- Include contact information or QR codes linking to your website
- Design seasonal patterns that showcase your brand colors in creative arrangements
Remember that personalization extends beyond imagery to include thoughtful material selection and functional features. According to Real Simple, the most appreciated customized items combine personal significance with practical utility – a beautifully designed bag that’s also perfectly sized for the recipient’s needs creates lasting appreciation.
Comparative Analysis: Fabric Paint Types for Different Effects
| Paint Type | Best For | Finish | Application Method | Durability | Price Range |
|---|---|---|---|---|---|
| Acrylic Fabric Paint | Detailed designs, solid coverage | Matte to semi-gloss | Brush, sponge, stencil | High | $$ – $$$ |
| Fabric Paint Markers | Precise lines, lettering | Semi-gloss | Drawing, tracing | Medium-high | $$ – $$$ |
| Puffy Paint | Dimensional designs, child-friendly | Raised, glossy | Squeeze bottle | Medium | $ – $$ |
| Fabric Spray Paint | Backgrounds, ombré effects | Matte | Spray | Medium | $$ – $$$ |
| Fabric Dye | Whole-bag color, tie-dye | Natural, soft | Dip, immersion | High | $ – $$ |
| Metallic Fabric Paint | Accents, festive designs | Metallic sheen | Brush, sponge | Medium-high | $$$ – $$$$ |
| Glow-in-Dark Paint | Fun effects, kid’s bags | Matte (light), glowing (dark) | Brush, squeeze bottle | Medium | $$ – $$$ |
According to Dharma Trading Company, the specific type of fabric paint you choose significantly impacts the final appearance, application process, and durability of your tote bag design. This comparative analysis helps you select the optimal paint for your particular project requirements.
Curing and Setting: Ensuring Durability
The final crucial step in creating long-lasting fabric-painted tote bags is proper curing and setting. According to Tulip Color, inadequate setting is the primary reason fabric paint cracks, peels, or fades prematurely. Different fabric paints require specific setting methods, so always consult the manufacturer’s instructions for your particular product.
Heat-setting is the most common method for permanently bonding paint to fabric. As recommended by Testors, after allowing your design to dry completely (usually 24 hours), place a thin cloth over the painted area and iron on medium heat for 3-5 minutes. The heat activates chemical bonding between the paint and fabric fibers. For dimensional paints like puffy fabric paint, avoid direct iron contact as it may flatten the raised design – instead, heat from the reverse side or use a heat gun held several inches away.
Some fabric paints require air-curing instead of or in addition to heat-setting. According to Jacquard Products, these formulations contain polymers that cross-link upon exposure to air. Allow at least 72 hours (longer in humid environments) for complete curing before washing or heavy use.
To maximize durability, Pebeo recommends waiting at least one week after setting before washing your tote bag. When washing becomes necessary, turn the bag inside out, use cold water and mild detergent, and avoid harsh agitation. Line drying is preferable to machine drying, particularly for the first several washes. Following these curing and care protocols ensures your personalized design remains vibrant and intact for years of use.
Troubleshooting Common Issues
Despite careful preparation, challenges may arise during your tote bag painting project. According to The Spruce Crafts, understanding how to address common issues saves time and prevents frustration:
Paint Bleeding Beyond Lines
If paint spreads beyond your intended boundaries, Crafts Beautiful recommends quickly blotting excess paint with a paper towel, then outlining the area with a fabric pen once dry to create intentional borders. For future projects, ensure fabric is properly pre-washed to remove sizing, use appropriate paint consistency, and employ masking techniques for crisp edges.
Uneven Color Application
When paint appears patchy or streaky, Plaid Crafts suggests applying additional thin coats rather than one thick layer. Allow complete drying between applications. For large areas, maintain consistent brush direction and work quickly to prevent drying mid-section.
Fabric Paint Cracking
If paint cracks after drying, DecoArt identifies insufficient flexibility as the culprit. For existing cracks, carefully remove flaking paint and reapply using fabric medium-enhanced paint. Preventatively, ensure you’re using actual fabric paint (not regular acrylic) or properly mix appropriate fabric medium with standard acrylics.
Color Transfer to Unwanted Areas
For accidental smudges, Tulip Color recommends using fabric paint removers while the paint is still wet. For dried mistakes, specialized fabric paint removers can be effective if used within 24 hours. For persistent stains, strategic design modifications can incorporate or disguise the error.
Paint Not Adhering to Fabric
When paint beads up or doesn’t adhere properly, Artistro identifies fabric sizing, residual detergent, or fabric softener as likely culprits. Thoroughly wash and dry the tote bag before painting, and consider lightly sanding synthetic fabrics to improve paint adhesion.
By anticipating these potential issues and knowing how to address them, you’ll approach your project with greater confidence and achieve professional-quality results regardless of your experience level.
Frequently Asked Questions
What’s the difference between regular acrylic paint and fabric paint?
According to Blick Art Materials, fabric paint contains specialized binders that maintain flexibility after drying, preventing cracking and flaking when the fabric moves. Regular acrylics typically become brittle on fabric. However, you can transform regular acrylic paint into fabric paint by mixing it with fabric medium, which adds the necessary flexibility and adhesion properties.
Can I machine wash my painted tote bag?
Yes, but with precautions. Americana Paints recommends waiting at least 72 hours after heat-setting before the first wash. Turn the bag inside out, use gentle cycle with cold water and mild detergent, and preferably air dry. Avoid bleach and fabric softeners as these can degrade the paint over time.
How do I prevent the paint from bleeding through to the other side of the tote?
Artist’s Network suggests inserting cardboard or wax paper between the layers of fabric during painting. The cardboard provides a firm surface for painting while preventing bleed-through. Ensure the insert is slightly smaller than the bag dimensions for easy removal after the paint dries.
My design doesn’t look as vibrant after drying. Why?
According to Princeton Artist Brush Co., fabric paints typically dry approximately 25-30% darker than they appear when wet. This color shift occurs as the binders cure and the water evaporates. To predict final colors more accurately, test your paint on a scrap of similar fabric and allow it to dry completely before committing to your design.
How long does fabric paint take to dry?
Jacquard Products explains that drying time varies by paint type, fabric texture, paint thickness, and environmental conditions. Thin applications may feel dry to touch within 1-2 hours, but complete drying typically requires 24 hours. Full curing, which determines washability and durability, usually takes 72 hours to one week. Humid environments extend these timeframes significantly.
Can I paint on dark-colored tote bags?
Yes, according to DecoArt, by selecting opaque fabric paints specifically formulated for dark fabrics. These paints contain higher pigment loads and opacifiers that allow them to show up on darker backgrounds. Multiple thin coats yield better results than one thick application. Alternatively, you can apply a base coat of white fabric paint to create a lighter surface for standard colors.
What if I make a mistake while painting?
Dharma Trading Co. advises addressing mistakes quickly with water while the paint remains wet. For dried mistakes, fabric paint removers can help if used within 24-48 hours. Beyond that timeframe, consider incorporating the mistake into your design or covering it with appropriate embellishments or darker colors.
Conclusion: From Canvas to Masterpiece
The journey of creating personalized tote bags with fabric paint represents more than just a crafting activity – it embodies the growing desire for personalization, sustainability, and creative expression in our mass-produced world. As we’ve explored throughout this comprehensive guide, the process combines technical skills with artistic vision, resulting in functional items that carry both practical value and personal meaning.
The versatility of fabric painting techniques makes this craft accessible to creators of all skill levels. Whether you’re a complete beginner employing simple stencils and stamps or an experienced artist hand-painting intricate designs, the fundamental principles remain consistent: proper preparation, appropriate materials, thoughtful execution, and proper curing. As Martha Stewart Living has consistently emphasized, attention to detail throughout the process distinguishes amateur projects from polished, professional-looking results.
Beyond the aesthetic appeal, personalized tote bags serve practical purposes while making meaningful statements. They function as eco-friendly alternatives to disposable bags, thoughtful gifts that demonstrate time investment and personal consideration, and even marketing tools for small businesses. According to National Geographic, a single reusable bag can prevent hundreds of disposable plastic bags from entering the environment, making your creative endeavor environmentally significant as well.
The satisfaction derived from creating personalized tote bags extends beyond the finished product to encompass the creative process itself. As noted by Psychology Today, engaging in creative activities reduces stress, improves cognitive function, and enhances overall well-being. Your fabric painting project serves dual purposes – yielding a beautiful, functional item while providing therapeutic benefits during creation.
As you embark on or continue your fabric painting journey, remember that each project represents an opportunity for growth, experimentation, and personal expression. The techniques, tips, and troubleshooting advice presented in this guide provide a foundation, but your unique vision brings the magic. Whether your personalized tote bag becomes a cherished gift, a conversation-starting accessory, or a practical everyday companion, it carries with it the unmistakable imprint of individual creativity that no mass-produced item can replicate.